User authorization: Difference between revisions
w>Jguillo No edit summary |
m 10 revisions imported |
||
| (3 intermediate revisions by 2 users not shown) | |||
| Line 13: | Line 13: | ||
== Creating an authkey == | == Creating an authkey == | ||
In order to create an authKey you must use [[ | In order to create an authKey you must use [[authkey.create]]. That function return a new authKey and its associated private key. | ||
'''IMPORTANT:''' You must save the authkey's private key for future use. It cannot be obtained again anywhere. If you lose an authkey's private key you will be forced to create a new authkey for the user. | '''IMPORTANT:''' You must save the authkey's private key for future use. It cannot be obtained again anywhere. If you lose an authkey's private key you will be forced to create a new authkey for the user. | ||
| Line 41: | Line 41: | ||
[[File:Userauth.png|none|Application authorization page]] | [[File:Userauth.png|none|Application authorization page]] | ||
Once the user authorizes your application, he is then redirected to the [[ | Once the user authorizes your application, he is then redirected to the [[bringback url]] as defined in the userkey. Redirection is automatic when the user already has an authorization of the same level. | ||
= Authorization state = | = Authorization state = | ||
You can query an authkey | You can query whether an authkey has been authorized using the [[authkey.state]] component. This component returns the current auth key status and the current [[nonce key]] to use in some funcion calls. | ||
Latest revision as of 08:07, 7 May 2021
In order to register works for an account you need an authkey. That authkey is the authorization a user has acknowledged so you can use his account.
An authkey has an associated private key. You must use the authkey's private key to sign the requests when using an authKey signed components. You must authorize yourself if you want to auto-register works.
Authorization level
Each authorization has a level, it can be GET, ADD or MANAGE
- GET level allows read operations on the user account
- ADD level allows new work registrations on the user account
- MANAGE level allows modification and deletion of registered works
Obtaining a user's authorization
Getting a user's authorization for your application is a two-step operation. First you must create an authkey and then you must redirect the user to a special page to activate that authkey
Creating an authkey
In order to create an authKey you must use authkey.create. That function return a new authKey and its associated private key.
IMPORTANT: You must save the authkey's private key for future use. It cannot be obtained again anywhere. If you lose an authkey's private key you will be forced to create a new authkey for the user.
User authorization of an authkey
Once created you must link the authkey to a user by redirecting the user to the /api-ui/authkey.edit page:
http://www.safecreative.org/api-ui/authkey.edit
?authkey=23j22wtpoguzgzk0fag39sey6
&level=GET
&sharedkey=zy9x4ol0ctg3btyswq7b5wi9
&ztime=1271749822662
&signature=f8d9fd7d0b9a9c517d963881a4e8ded03cb2cec5
You must provide the following parameters to this page:
- authkey: New authkey obtained from authkey.create
- level: Desired authorization level (GET, ADD or MANAGE)
- sharedkey: You application sharedkey
- ztime: Server ztime
- signature: Parameters signature using the authkey's private key
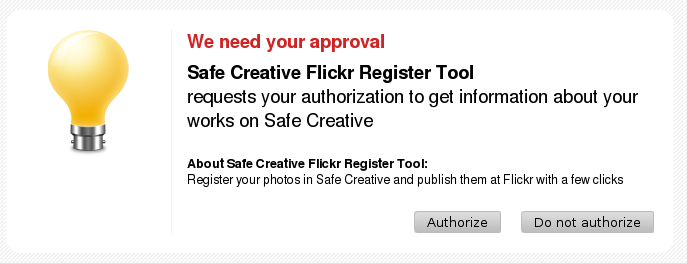
User will be asked to log in Safe Creative and be presented with a page like this:

Once the user authorizes your application, he is then redirected to the bringback url as defined in the userkey. Redirection is automatic when the user already has an authorization of the same level.
Authorization state
You can query whether an authkey has been authorized using the authkey.state component. This component returns the current auth key status and the current nonce key to use in some funcion calls.